top of page
intro to 3d animation the bouncing ball animation -
First brought in a sphere and moved it to the side . To key the ball I clicked where I want to on the timeline first. Secondly, I moved the shpere infront of the last red key line and then I pressed s to key my position. Click, move , press s
(The red line shows its been keyed)
To add squash and stretch to the ball I first keyed it. bouncing up and down. The translate y, x and z key frames were all deleted in the channel box. I started by the copying start key frame value to the end key frame aswell, for more smooth action. In animation preferences I set the playback speed to 24fps x 1. After this I used the graph editor to fix the key frames in translate y .
The set playback time was set to 20 and the set end time of animation was set to 20

Finally, I went to the start key and last key and used the transform tool to squash the object keying it by pressing s kaing sure translate y is selected . I then stretched the ball in the mid point and keyed it making sure pshere1 was selected in graph editor.
Lattice deformer , Sack of flour rig
First I started off importing the flour sack rig into maya by setting my project first.
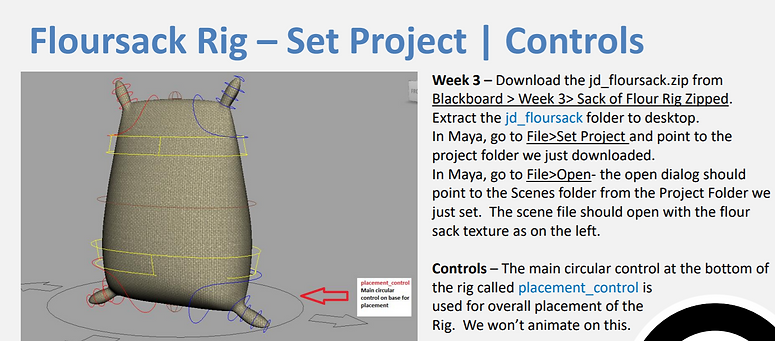
Then moved the control rig in maya and experimented with different poses . After this I selected the rig arm by pressing (ctrl and shift)and legs and then keyed it pressing s


Animation preferences set to 24fps x 1. I then started to key the rig rotating it in different positions moving it around
Inverse kinematics/ animation output
Working with arm fk rig to animate it. Shift left click on Null in outliner to expand it.
Fk - forward kinematic , joints rotate in hierarchy to animate,. Forward Kinematics setup (forwards motion)
(Arm forward kinematic rig)

IK-Control Rig H used to animate arm/hand placement. Inverse Kinematics, move the hand and the rest rotates to follow.
(Arm Inverse kinematic Rig)

Head Turn: and posing
I did a basic head turn and pose here to get familiar with the controls

Assignment1: basic weight mechanics (bouncing ball)
For this assignment I wanted to show a basic squash and stretch animation so I downloaded this ball scene then animated it. I then moved the ball up in tranlslate y . right clicked in translate y press key selected , then changed it back to 0 so the ball can move down.
Then brought the ball up halfway whilst have auto key on . After this I edited the translate y using the graph editor for amore sharper bounce using break tangents, using middle mouse button to move individual point. Made a few more bounces aswell

Then used the graph editor to make more bounces
Now I applied squash and stretch to it then playbast it using skydome lighting. went to view and turned off nurb curves
Final playblast
Ball download reference :
Analysing work:
I could've improved by rendering out the scene with a surface rather than a playblast . Also I couldve created an obstacle course to move the ball around
Assignment 2 : character animation
I wanted to show the character moving its head and throwing a ball over its head whilst its moving side to side and blinking.
Firstly downloaded the updated version Elevenrig_v1.2
Then showed the head moving side to side by selecting the head control and move tool then pressing s to key after slowing moving the head in a certain direction

I then moved the head up so that it can have a weight effect when turning side to side
Finally below is the technique I used to add blinking to the character
Video on how I Fixed the textures (went to windows rendering editors then hypershade)
Next is a tutorial on how I did the ball throw to the hands
Final playblast of character animation for assignment 2
Assigment 3 : animating to 11 second sound clip
my idea is to have a character walking then producing dialouge and then a ballon floats up in the air whilst talking
I downloaded the eleven rig in week 6 walk folder and then animated a walk . After this I created the lighting setup with a backdrop and two area lights , as a test to see the lighting
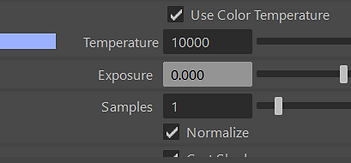
Area light 1 : using the values/ preferences below below


Area light 2 :


The lighting came out well
I then downloaded the eleven rig lip sync and started to animate it to the audio. After this I added a skydome light and animated expressions in my characters face.
11SecClub_April_Competition
00:00 / 00:11
where I got audio file from
as I imported another eleven rig into the scene I turned the camera so the character can walk from another direction
I then made a balloon , imported it into my circus scene, then positioned it to the hand . To attach it to the hand I clicked the ballon shape then shift clicked the hand control and went to edit parent
Now I have to render my scene then put in after effects. to get better render I pressed ai sky dome in outliner , then went to the skydome attribute editor and changed the sampling slider to 8
Final Render

bottom of page