top of page
Introduction to nuke
From the node graph ( right click on viewer 1 , image then colour wheel)
I then connected the viewer 1 to colour wheel to see it in the viewer window


After this To get more solid colours i used the gamma correction slider at the top . I then got more colours from this by using a grade node by pressing G and connecting them together. Also put a transform mode in by pressing t .

Organisation and Roto
In this week we learnt to rotoscope around images and mainpulate them.
To start off I Clicked R in the viewer and brought in the overhead building shot to roto around.
I first played the footage then did a rotop for the top of the building. I brought in a copy node first by pressing k and and a roto node by pressing O, then conncected them all together.
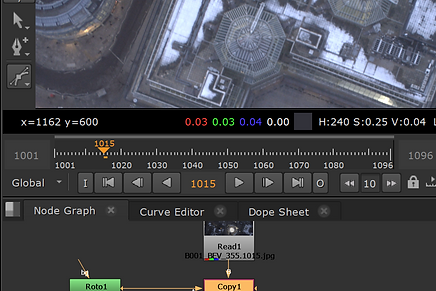
Then I used the filter tool to soften the edges and pressed M to get a matte overlay of the building.
(Matte Overlay)

After this I selected all my points and moved back on the timeline so I could rotoscope the building for the while sequence. I pressed q on the keyboard to turn the overlay on/off.
(Pressed space on keyboard to bring up this view)

Complex Roto
This week I did a roto of a waving hand .Started off by analysing the thumb first bringing in a copy node pressing k and roto node pressing (o). After I used the bezier tool to draw around the thumb


Used bezier on first section of the thumb, and blspine on the second section of the thumb.

I then did the roto for the thumb. but first I made sperate folders for it.
Basic keying
In this lesson we learnt about keying so how to remove parts of an image
I then brought in the nuke file and added a keyer and connected it with the viewer( pressing tab in node graph and searching "keyer")


changed to alpha channel then changed yellow bars in keyer to cut out the sky . After this I then inverted the image (ticking the invert box in keyer) , brought in copy, premult node and after merge node.
I finally connected the nodes all together and made the cloudy sky match the background of the bridge instead of the very bright sky.


Advanced keying:
In this lesson we learnt how to cover the green screen whilst keeping the detail of a character
De noised the shot first pressed tab in node graph searched denoise.
Brought out a key light node began to key the side of her head
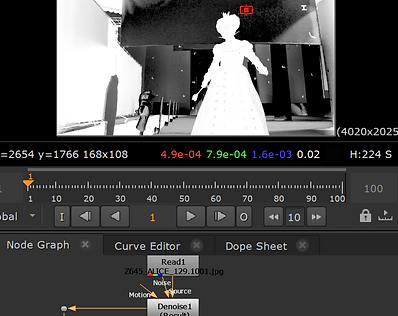
I then pressed refines the scene using the screen matte setting and pressing a to get back the colour. After this brought ina copy node and blur node to make image less sharp


Then sampled new area and used key mix and roto tool to bring back detail . After used a premult node to get green screen to merge with character


Final process of clearing green screen :


Tracking:
Firstly I brought in image of car and the added a roto node by pressing the tab and searching roto in node graph. Then used bezier tool to draw shap around the wind screen and right clicked on planar track backwards .

Next I baked the bezier shape onto the car for the animation and added a roto to it. I also added a grade node to make the wind screen lighter


Advanced clean up : Mex post box
In this lesson I learnt to remove a logo from a box and add in a shadow
Played the scene first then brought in roto node at first frame. then I drew bezier shape around box.
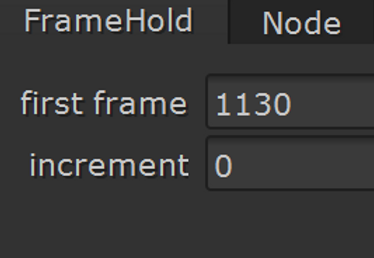
went to 1040 for hero frame and brought in frame hold node . and connected it with roto paint to take off the logo using clone tool . pressing control first and moving to sample an area. then put logo back on box by rearranging the nodes as seen below.

Then viewed premult node and applied the patch
Patch on box with node graph display


Now I will grade the patch . so I put the grade after copy node. put mask from grade node onto roto node. made a shape using bspline to make corner of box darker. using offset slider in grade 1 . chnaged the name of grade 1 to " Top corner"
I put another grade node below and named it "overall", to improve the grade of the box , changing the sliders in the luminance view by pressing Y.
Now the final step was to have a shadow showing on the box when the hand moves. viewed original image and rotoscoped the shadow
Then viewed the merge node and did the rest below . when i viewed the premult node I pressed 1 and 2 to switch between the different nodes
Assignment 2: class task
for this assignment, we had to use the techniques we've learnt to correct and image. we had to get rid of the letters on the wall , place an image on the tv, remove the logo on the bag and change the green screen

Removing the letters:
brought in a roto node and use eclipse tool to draw around each letter. after i planar tracked it
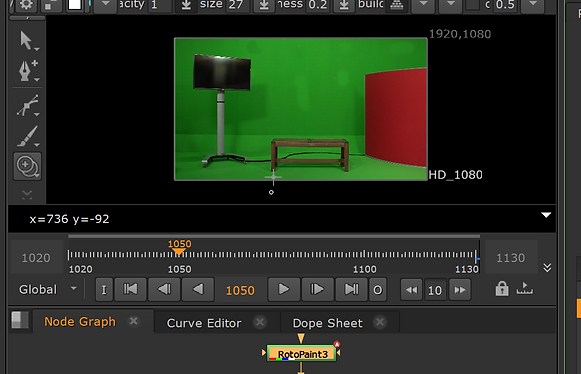
Next I set up the nodes in the picture below . brought in a frame hold node. double clicked frame hold node and typed in 1130 in first frame

I then brought in a roto paint node ontop of frame hold node using the clone tool to paint out the letters
Now i applied the patch back to the image by bringing in a copy node and a roto shape. then viewed the original image and drew another roto shape around where i painted the letters out
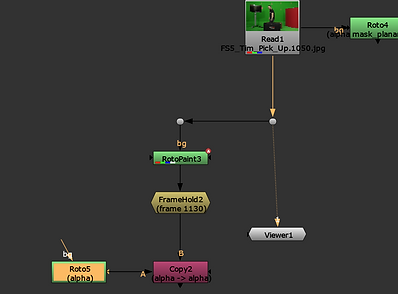
now i had to roto out the person so he doesnt walk under the patch

removing logo on the bag
Firstly, i went to the first frame and brought in a roto node. Then used the bezier tool on the side to draw a shape around the logo


I then selected the whole shape , right click planar track forward.
Now I have the corner pin 2d data i will paint out the logo. firstly, i brought in a frame hold node clicked frame hold node and typed in 1020 for the first frame

Now i brought in a roto paint node and used the clone tool to remove the logo, making sure i put the viewer to the frame hold node.

Now i applied the patch back to the footage so the logo doesnt show on the scene. after this i ordered the nodes in the image below and moved onto the final step.
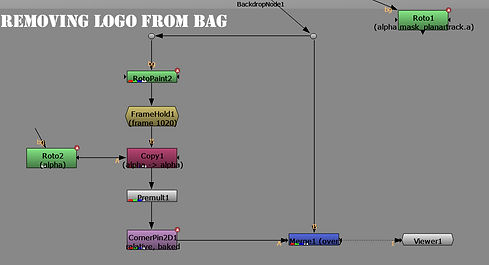
Finally I selected the corner pin 2d1 node and went to the "from tab" and clicked the copy to button. after I clicked all the squigly lines and turned off the animation
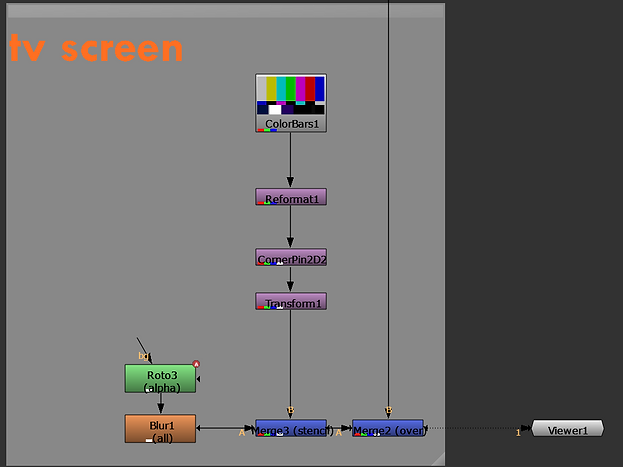
applying the colour bars to the tv
I brought up another merge node under the merge node for removing the logo. I then added the colour bar node and attached it to a reformat node.

I then rotoed out the head so it wont go under the tv
adding blue screen:
brought in a keylight node and viewed it. clicked marker box next to screen colour and ctrl shift and clicked on green screen area. after wards I pressed a to view the alapha channel.


Next double clicked on keylight node and adjusted the clip black and white setting in screen matte and went back to the viewer and pressed a to bring up the image again


brought in merge node connecting a pipe to keylight and b pipe to the constant, I changed the constant colour using the colour wheel on the side. then viewed the merge node so blue screen is in backgrund


My Final node arrangement :

after I used the write node to render out the scene then put it into after effects

my final render:
bottom of page